Showing posts with label diy. Show all posts

Monday, June 4, 2012

Thrift Store Tray Before and After


  My cousin is getting married on the Outer Banks this Friday.  She found these trays online and wanted to have something similar to use for her place cards, without the $59.99 price tag.  I sent her a picture of a tray I had purchased at a thrift store for $4.25 to see if it would work, all it needed was some paint.  She said it would, so I got to work recreating a old and yucky tray into something cute and beachy.


Both trays are from Shore Chic.


....and the yucky before pictures of the thrift store tray.  
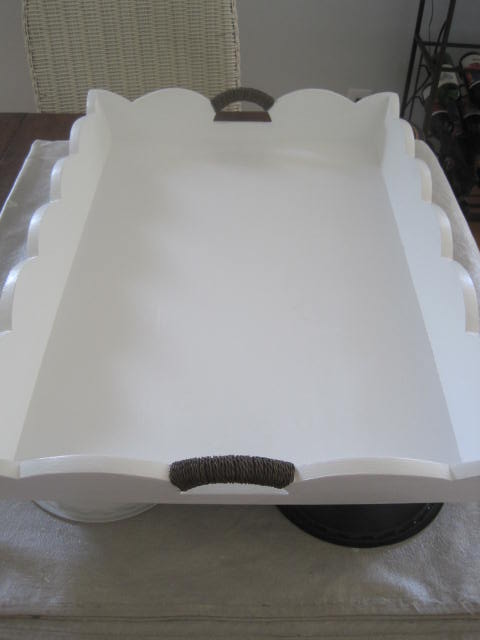
Our tray measured 17" x 24" x 3".


This is how it looked after a coat of primer and then I sanded down some of the rough spots.


After two coats of white Satin paint.


 I had a quart of blue paint (Valspar Rain Dance) forever in my garage that was from an old project and thought the color would look similar to the blue on the $59.99 tray.  The technique I used to paint on the blue paint is called dry brushing.  You dip your brush in the paint and then wipe it off on a cloth or in my case, a paper towel.  It took quite a few coats of blue to get the color intensity that I wanted but it was worth it in the end.


The finished tray.  
The tray will be on a table with a white linens and the colors of the reception are royal blue and chartreuse green with hydrangeas on the cake, which I think the tray will tie in nicely to the blue color of the tray.


Not too bad for a $55.74 savings!!!  
I can't wait for the wedding, my sister and my Mom will be here this week, and we drive up on Friday morning.  I am doing the bride's makeup so I am so excited for that too,
(..and the kiddos are staying home with Dad.  Woohoo, girl's road trip!!).  
Should be lots of fun and I'm sure I will have some good pictures, I love the Outer Banks!

~  Kim :)

Friday, April 27, 2012

Link Party... cute little table


  I haven't shown off my little in-the-trash-on-the-side-of-the-road find yet.  I am linking over at Miss Mustard Seed blog to show it off.  I thought about distressing it but I just did the top and then we had a party and I haven't gotten around to do the rest.  But it's a cute little table and the best thing... it was FREE (except for the cost of primer and Rust-oleums Heirloom White spray paint)!!!  Love it.


I didn't even bother filling in the holes from the drawer pull, I just turned it around!!

~  Kim :)

Tuesday, April 17, 2012

Spray Paint Yellow Lamp


  Hi everyone, I'm sorry I have been M.I.A. for a few days.  My Mom came into town on Thursday and my sister arrived today, my son's 4th birthday is Thursday and his birthday party is at our house on Saturday.  I also have two wedding makeup clients this weekend.  Whew!!!... on top of all that I have been very BUSY doing projects around here!

  I have been on the lookout for a thrift store lamp to spray paint yellow for awhile and when I picked up the Country Living magazine I knew I had to do it.  So Sunday I took some time to hit the thrift stores.


Here is a $4.25 lamp from Goodwill that was screaming for some spray paint love!!  


  The lampshade was in good condition so I left it.  
I used Rust-oleum's Sun Yellow in Gloss.  I didn't even prime it, which I have never done but it was so much easier, and it seems to be just fine.


 I mean I LOVE it!!!


Tomorrow I will show what I've done different in our family room.  Remember I was saying I wanted some more color...well I've got it now!

~  Kim :)

Tuesday, April 10, 2012

Hallway Board & Batten {Sneak Peak}


We hopped on the Board & Batten bandwagon!!

I've been holding out on showing you because still aren't done, but it might be awhile until we are totally finished, because we have a 4 year old birthday party to plan!  


The before started out really rough... our hallway looked like this for 2 years!  I couldn't decide on a paint color... I couldn't decide what to do but just painting it didn't seem right.   Boring, even.


I had seen board and batten done all over blogland but it wasn't until one day it hit me that it would look fantastic in the hallway.  I also wanted to create a sort of art gallery for all of the artwork my two children bring home.  I had frames from the thrift store that I spray painted and from Ikea to start with.


It took me awhile to figure out how I wanted to do it.  I could have gone a cheaper route and used lattice pieces, but it didn't seem right since we removed the baseboards and put in 1 x 6 inch boards to replace them.  I wanted something thicker and substantial.  We ended up using 1 x 4 inch boards for the top and vertical pieces.  We bought the already primed boards to make our life easier!


This picture (below) I got off Google helped put the pieces together.  We left out the back board because we have smooth walls, and we did not put the shelf part at the top because it was a hallway, and we were afraid we'd be bumping into it.


The remaining To Do List is to:  replace those awful lights, put down sisal runners until we refinish the hardwood floors, and to purchase more frames for the kid's artwork.


The view from our bedroom at the end of the hallway... see the Legos :) 


The Ikea frames. 


It's not done, but we're getting there!

~  Kim :)

** the paint color is Smoky Charcoal by Glidden if anyone is interested.